Meat Balls Recipe - Slow Cooker Batch Cook


In an effort to get my Little Miss to eat better I'm trying to re-create some of her favourite less than healthy meals as healthy batch cooked versions.  This meatball recipe was a huge success, she eats every bite and usually asks for seconds.  

I made a whopping 27 servings for just £8.33, that's just 31p per serving.  It took a little more time and effort to prepare than many of my other recipes but the extra effort was well worth it.  


Ingredients and Tools:
2kg Beef Mince £5.96
3 Tins Chopped Tomatoes 84p
1kg Onions 50p 
Tomato Puree 31p
Passata 32p
3 Eggs 24p
Garlic 16p
Stale Bread
Parsley
Oregano

Total = £8.33
Makes 27 servings = 31p  per serving

Food purchased from Aldi


Mince the garlic.


And dice the onions.


Fry them until soft.


Then add them to the slow cooker along with the tomatoes.


Finely chop the oregano and add it to the slow cooker.


Add the passata and cook on low for about 3 hours or longer if it's convenient.


For the meatballs crumb the bread with a food processor.


Mix the breadcrumbs with the mince.


Add the tomato puree, egg and parsley.


Mix until well combined.


Form into balls.


The meatballs can be frozen raw and oven cooked after defrosting.


Or they can be oven cooked for about 25 minutes then cooled and frozen cooked ready to be microwaved after defrosting.


Blend the sauce until smooth.


If freezing the meatballs cooked they can be frozen in the same tub as the sauce.


You can freeze the raw meat balls and sauce separately or alternatively freeze them together in an oven proof container and oven cook them both at the same time (after defrosting).


We like it sprinkled with grated cheese.

Linking Up To:


Here are some of my other batch cook mince recipes:


#simplycrafting #homecooking #budgterecipe #batchcooking #mealprep #slowcookerrecipe #healthyeating #healthyeatingideas #healthyeatingforlife #healthyeatingonabudget #healthycooking #healthyrecipe

How to Sew DIY Quilted Place Mats - Free Step by Step Pattern


I'm sharing how I made a set of quilted place mats for my new (to me) dining table.  It's a beautiful antique style table and will look stunning in my new dining room.  I'm keen to keep it that way so I'll be taking steps to protect it from getting damaged.

Tools and Materials:


I'd normally use quilting wadding in between my top and bottom fabrics but I've completely run out of wadding.  I'm working on reducing my fabric stash so instead of running out to buy more wadding I'm making do with what I've got in my stash.  Which happens to be scraps of fleece fabric.

I'm using a waterproof fabric for the backing to protect my new table from any spills.

Before you start each scrap of fleece or whatever thick bouncy fabric you're using in place of batting, has a straight edge on at least one side.  I used my rotary cutter and ruler to trim one edge straight.


Then set your sewing machine stitch width to the maximum.


And the stitch length needs to be at maximum too.


Then butt the two straight edges together and sew over the join.

You'll need to push the edges together just slightly, not so much that they overlap but just enough that the don't separate when the sewing machine foot stitches over them.


You should have a larger piece of fabric that you can then cut down to your desired size.

I cut mine to 12" x 18".


Layer the quilting pieces backing fabric right side down, batting then the top layer right side up.


Pin the three layers together.


Then start quilting.

I'm using simple rows of straight stitches across the width of the place mats.  Start with the line in the centre of the place mat.


Then use a quilting guide bar to position the next line of stitching.  If you don't have a quilting guide bar you can mark the rows of stitching with tailors chalk or pins at either end.


Keep on quilting until you reach the outer edges of the place mat.


Now for the binding.  Cut strips of fabric 2.5 inches wide.  Pin the lengths together at right angles and sew diagonally across to join.


Press the seams open.


Then trim away the excess fabric.


Press the continuous strip in half length ways.


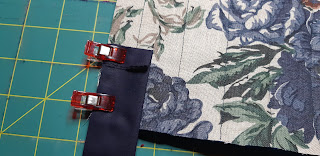
Fold the end of the binding over slightly.  Line up raw edges of binding with raw edges of project an pin or clip it in place.


At each corner fold the binding away form the project.


Then fold it back on itself.


Cut the binding a little after the start of stitching so that the raw edge will be neatly hidden.


I'm using my 1/4 inch quilting foot for the sewing.  


It has marks on the foot at 1/4 inch from the needle, this makes it really easy to keep a consistent 1.4 seam the whole way round.


After the binding is sewn in place form the front turn it to the back of the place mat.


It should just cover the line of stitching on the back of the project.

Stitch along the original line of stitching (stitch in the ditch).


Linking Up To:


Here are some of my previous quilting projects:


#simplycrafting #makersgonnamake #sewing #handmade #sewersofinstagram #dressmaker #sewistsofinstagram