Showing posts with label Patchwork. Show all posts

Double Irish Chain Patchwork Quilt Sewing Project


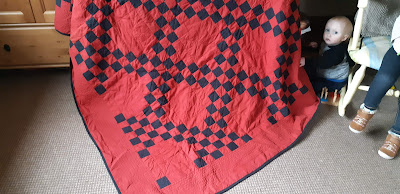
I made this massive quilt as a wedding present for a couple of friends.  The design is called a double Irish chain.  It's supposed to represent the couple's journey through life side by side.  It's a lovely sentiment and the fact that it's a super easy pattern that looks really complicated doesn't hurt lol. 

Tools and Notions:

Most of my sewing stash comes form the lovely people at Minerva Crafts.


I think I had this quilt in mind long before the couple actually got engaged.  I had a large amount of good quality red and black cotton in my stash.  Such big pieces of fabric needed to be used something special. 


I was going to crop out the adorable photo boomer . . .


But he's too cute to leave out lol.

Here's the notes I made in my Bullet Journal.  The small squares are 2.5" and the large blocks measure 10.5".  I used 1/4" seam allowances.  

I made a note to remind myself to always press the fabric towards one colour or another.  Being consistent makes the blocks easier to line up accurately later on.


I've used some more red for the border - I figured I might as well use all I had and I think it frames the quilt perfectly.


The binding is self made using the Quilt Binding Tutorial I blogged about previously.


I had a lot of fun quilting this one.  I've stitched in the ditch around each of the large blocks.  Then a small block either side.  I've quilted along the diagonal lines crated by the design and also diagonally though the centre of each large block.  

For the border I've quilted several straight lines around the edge.


I'm delighted with my efforts.  I do hope the bride and groom like it.


Log Cabin Patchwork Quilt Sewing Project


This is my first patchwork project in ages.  I'd forgotten how much I enjoyed it.  

Tools and Materials:

Most of my sewing stash comes form the lovely people at Minerva Crafts.


Here's the plans from my Bullet Journal.  The strips were cut 2.5" wide with a 1/4" seam allowance.  These scruffy notes are the length of the strips required in each fabric to help me decide which fabric to position where on  the design.


In keeping with patchwork tradition this quilt is made entirely of scrap fabric.  Admittedly the two prints were someone else's scraps that I bought at a car boot sale.  And the beige formed part of the immense pile of scraps I inherited.  The dark blue is actually on old shirt that was being discarded.  The palest blue was a very old sheet also from my inherited stash.  Instead of batting I backed the quilt with a old velvet curtain lining.  


Log cabin has always been my go to patchwork pattern.  It's so quick and easy to cut and sew, with very few corners to match.  


In fact I've used sashing on this design so I've got away without a single corner to match - whoop whoop!!


I've basically done a normal log cabin design then added an extra row of the palest fabric so it look like the inner two are all framed with the palest fabric.  I really like the effect.


This is my first attempt at using a walking foot to stitch in the ditch for the quilting.  I'm not so sure it really makes that much of a difference but I'll preserve, maybe it just takes practice.


I've bound the quilt with some leftovers of the darkest blue.  Here's a quilt binding tutorial I wrote.


Quilt Binding Tutorial


Quick and easy custom quilt binding sewn entirely by machine.

Here's what you'll need:
The fabric I'm using is an old pillowcase.


Cut strips of fabric 2.5 inches wide.


Join the lengths at right angles and pin.


Sew diagonally across to join.


Trim the excess and press flat.


Fold in half, wrong sides together and press.


Line up raw edges of binding with raw edges of project.


Fold the end of the binding over slightly.


And sew with a 1/4 inch seam allowance.


At each corner fold the binding to the right.


Then back on itself.


Before sewing along the next side.


Cut the binding a little after the start of stitching.


Fold the binding over to the back and pin in place.  It should just cover the line of stitching on the back of the project.


Stitch along the original line of stitching (stitch in the ditch).


And done!


Here's a close up, you can see the stitching has caught the binding on the back of the project.


Link Ups: