Showing posts with label Bullet Journal. Show all posts

Bullet Journal - Weekly Layout


Preparing my weekly spread for the next couple of weeks.  I use Rocket Book pages that are reusable and scan easily into Evernote should I ever need to access them the future. 

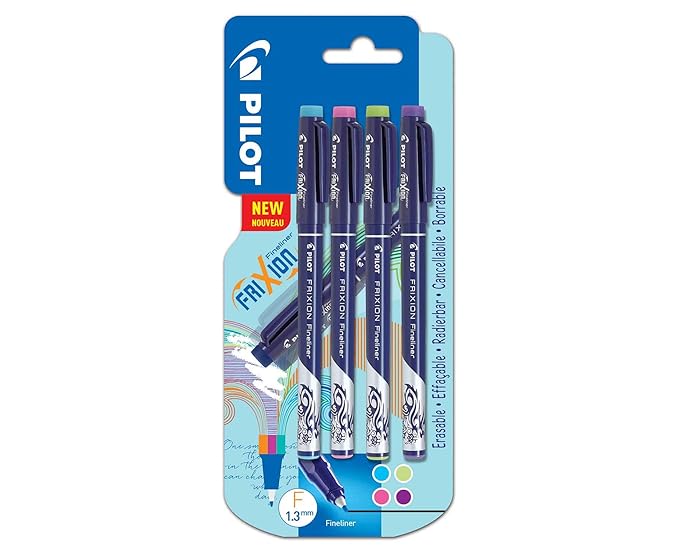
Pilot Frixion Fineliner Review


I treated myself to a pack of these Pilot Frixion Fineliners.  

Pilot FriXion Fineliners Pack of 4 Light Blue/Pink/Green/Violet


I'll be testing them with my Rocketbook and sketching paper.


The pens write beautifully on both types of paper.


They dried pretty quickly on the Rocketbook so there wasn't any smudging which is an issue I find with the Pilot Frixion Fibre Tip Pens.


I wasn't surprised that they wrote nicely on the sketching paper, a good quality pen on good quality paper should always result in a pleasant writing experience.


Erasing the Pilot Frixion Fineliners wasn't as straightforward as advertised.  I ha to rub so much I was rubbing away the surface of the paper.  I'm assuming this is because I used sketching paper instead of a more traditional smooth surface.


Of course easing on the Rocketbook was dream.


I'm really impressed with the Pilot Frixion Fineliners.  Th3ey'r elovely to write with and will make great titles and little details in my bullet journal.   I think I'll be investing in more of them in place of the Pilot Frixion Fibre Tip Pens I use at the moment.  


What's in My New Bullet Jounral Supplies Bag


Squee!!  I treated myself to a new Bullet Journal supplies bag, one that can hold all of my bullet journal goodies!!  I'm gonna just jump right in.


It comes in a variety of colours, I opted for Burgundy.


There's two zippered pockets in the front and pen loops on the right.


The next "page" has small pen loops on the left and big ones to the right.


The next one has big pen loops on the left and small ones on the right.


And finally big lens loops and a deep pocket section with another zippered pocket.  The first thing I did was re-arrange the "pages" so that the smaller pen loops wee all at the front.  I'll manage with the bigger ones but the smaller ones are better for my purposes so i want them at the front where I'll be putting my most used pens.


Those being my Gel Ballpoint Pens.  I bullet journal in a Rocket Book as well as normal paper so I use a lot of Frixion pens.


Next I have a set of Frixion Highlighters.


Then I've popped my cheapo gel pens in the case.  I got these from Aldi a couple of years ago, I wouldn't recommend them.  I should chuck them but I just can't bare to see them go to waste.  


Then I have a set of DoCrafts brush tip pens.  I have had these for well over a decade and the are still going strong.


I have a very old and simple set of Crayola Watercolor Colored Pencils.


I even had room for a few random bits on the back section.


And it closes!!


I've filled the front zippered pockets with my stencils and some washi tape.


I put some other random bits I don't use often in the very back pocket.


And there was still room for a pack of paper.


Unfortunately my Staples Arc Bullet Journal will not fit.


But it still closes


and there's even room for a little clip on light.


It bulges a bit but it's all in there.


I'm really impressed with my new purchase.  It fits all of my supplies together in one place.  It keeps them all neat and organised so I can easily grab whatever I need.


DIY Bullet Journal Divider Tabs


I've got a standard set of Staples Arc dividers but there's just the five sections and I need at least seven.  


My bullet journal is colour coded.  I've cut a strip of each colour 2cm x 5cm.  Each strip is folded in half and the corners rounded.


I've labelled them with letter peel offs.


And stuck them to each of my section cover pages with two bits of tape.


It's nice to have my colour coding so visible on every page.  Hopefully these dividers will be sturdy enough to last a while.


Bullet Journal Colour Coding Cover Page

I've just started colour coding my bullet journal which is basically my life on paper so I guess I could say I'm colour coding my life.  The rest of my crafting life seems to work well with a ROYGBIV colour scheme so it just seemed natural to apply it to my bullet journal too. 


My life is so full, there's so much I want to do and make.  Of course I want to do it all NOW and that just isn't realistic.  But whenever I focus on one thing I feel like I'm failing at the others.  I've found the trick is to focus on each area once a week (or month). 


So I've divided my life up into seven categories, one for each day of the week.  I don't necessarily devote the entire day to that activity because there's always boring stuff to do like the washing.  But my spare time (aka nap time) each day is devoted to a different craft or area of my life. 


Each focus area has a colour, a day and a Rocketbook symbol (more on that later).  Plus there's personal goals like reading more, learning something new and getting fit.  They're sort of tagged onto the bottom in grey - because I ran out of colour and time for my personal goals (how fitting).

So I've made a cover page to highlight these focus areas and act as a key to remind myself of the colour coding.


Bullet Journal - Gardening Calendar

I usually start thinking about gardening in February but for some reason my mind' turning to it early this year.  It's probably this lovely mild weather we're having at the moment - short lived I'm sure but it's getting me motivated.

As always I've started by digging out my seeds and for the first time in like forever, I don't need to buy any more.  My basil and parsley plants seem to have given up on life and they just happen to be the only two herb seed packets I have left.  


I always struggle with timings in my sowing, planting out and harvesting.  I start sowing indoors very early which is fine but for some plants it's way too early - then I wonder why they fail.  I always loose some crops because I've planted them out months too early.  And the tiny minority that make it to harvesting tend to rot on the plant because I've assumed harvesting is done for the year.


So this year will be different - famous last words!  I've copied the recommended sowing, planting out and harvesting times from the back of every seed packet and put hem in a chart.

On the left I've a list of my seeds with months across the top and then a section for notes.  I've squeezed the key on the end, red for sowing indoors, green for planting out, blue for sowing outdoors and yellow for harvesting.

Hopefully this will keep me on track but time will tell.